Cendre top- improving sustainability and international relations

I had great intentions to improve my sustainability efforts by making a zero waste pattern for quite some time- yet I never seemed to quite get around to it until inspiration came from across the border- Canada!.    .

An Instagram challenge suggested completing a sewing project with a friend, so I reached out to Hélène- @hportemanteau -who hails from Canada. I follow charming Hélène on Instagram and we have exchanged messages. Also, I admit I am a bit of a Canada fan girl- Banff, the genuinely friendly people,  Joni Mitchell, maple syrup, etc. I contacted Hélène and proposed improving the Minnesota-Montreal or US- Canada alliance with a joint February sewing project. Hélène agreed and brilliantly suggested we both make a zero waste project. Superb!

Zero waste patterns are patterns that produce a garment with little or no scraps.  A zero waste pattern typically has pattern pieces that fit together perfectly so virtually no fabric is wasted when cutting.

Hélène had already done a bit of zero waste pattern research and purchased a few zero waste patterns by Liz Haywood. For the February challenge, we both decided to make the Cendre top for maximum wearing potential and because it had several design variations - although in the end, we both chose the simple bateau neckline.

FullSizeRender.jpg

The Cendre pattern is more similar to a recipe than a traditional sewing pattern.  There are no pattern pieces to trace or tape- which can be a relief but also unsettling. You get drawn diagrams and measuring instructions.  I had that old adage measure twice, cut once in the back of my head.  In fact, I measured probably twenty times.  I was a bit nervous without the typical pattern piece security.  The pattern fits together like a puzzle and the leftover bits of fabric are used for embellishments, such as a belt or frills for this top. Although, I didn’t end up making any of those.

For my Cendre, I chose a piece of silk from my stash originally purchased from the remnant bin at Treadle Yard Goods -another sustainability win.

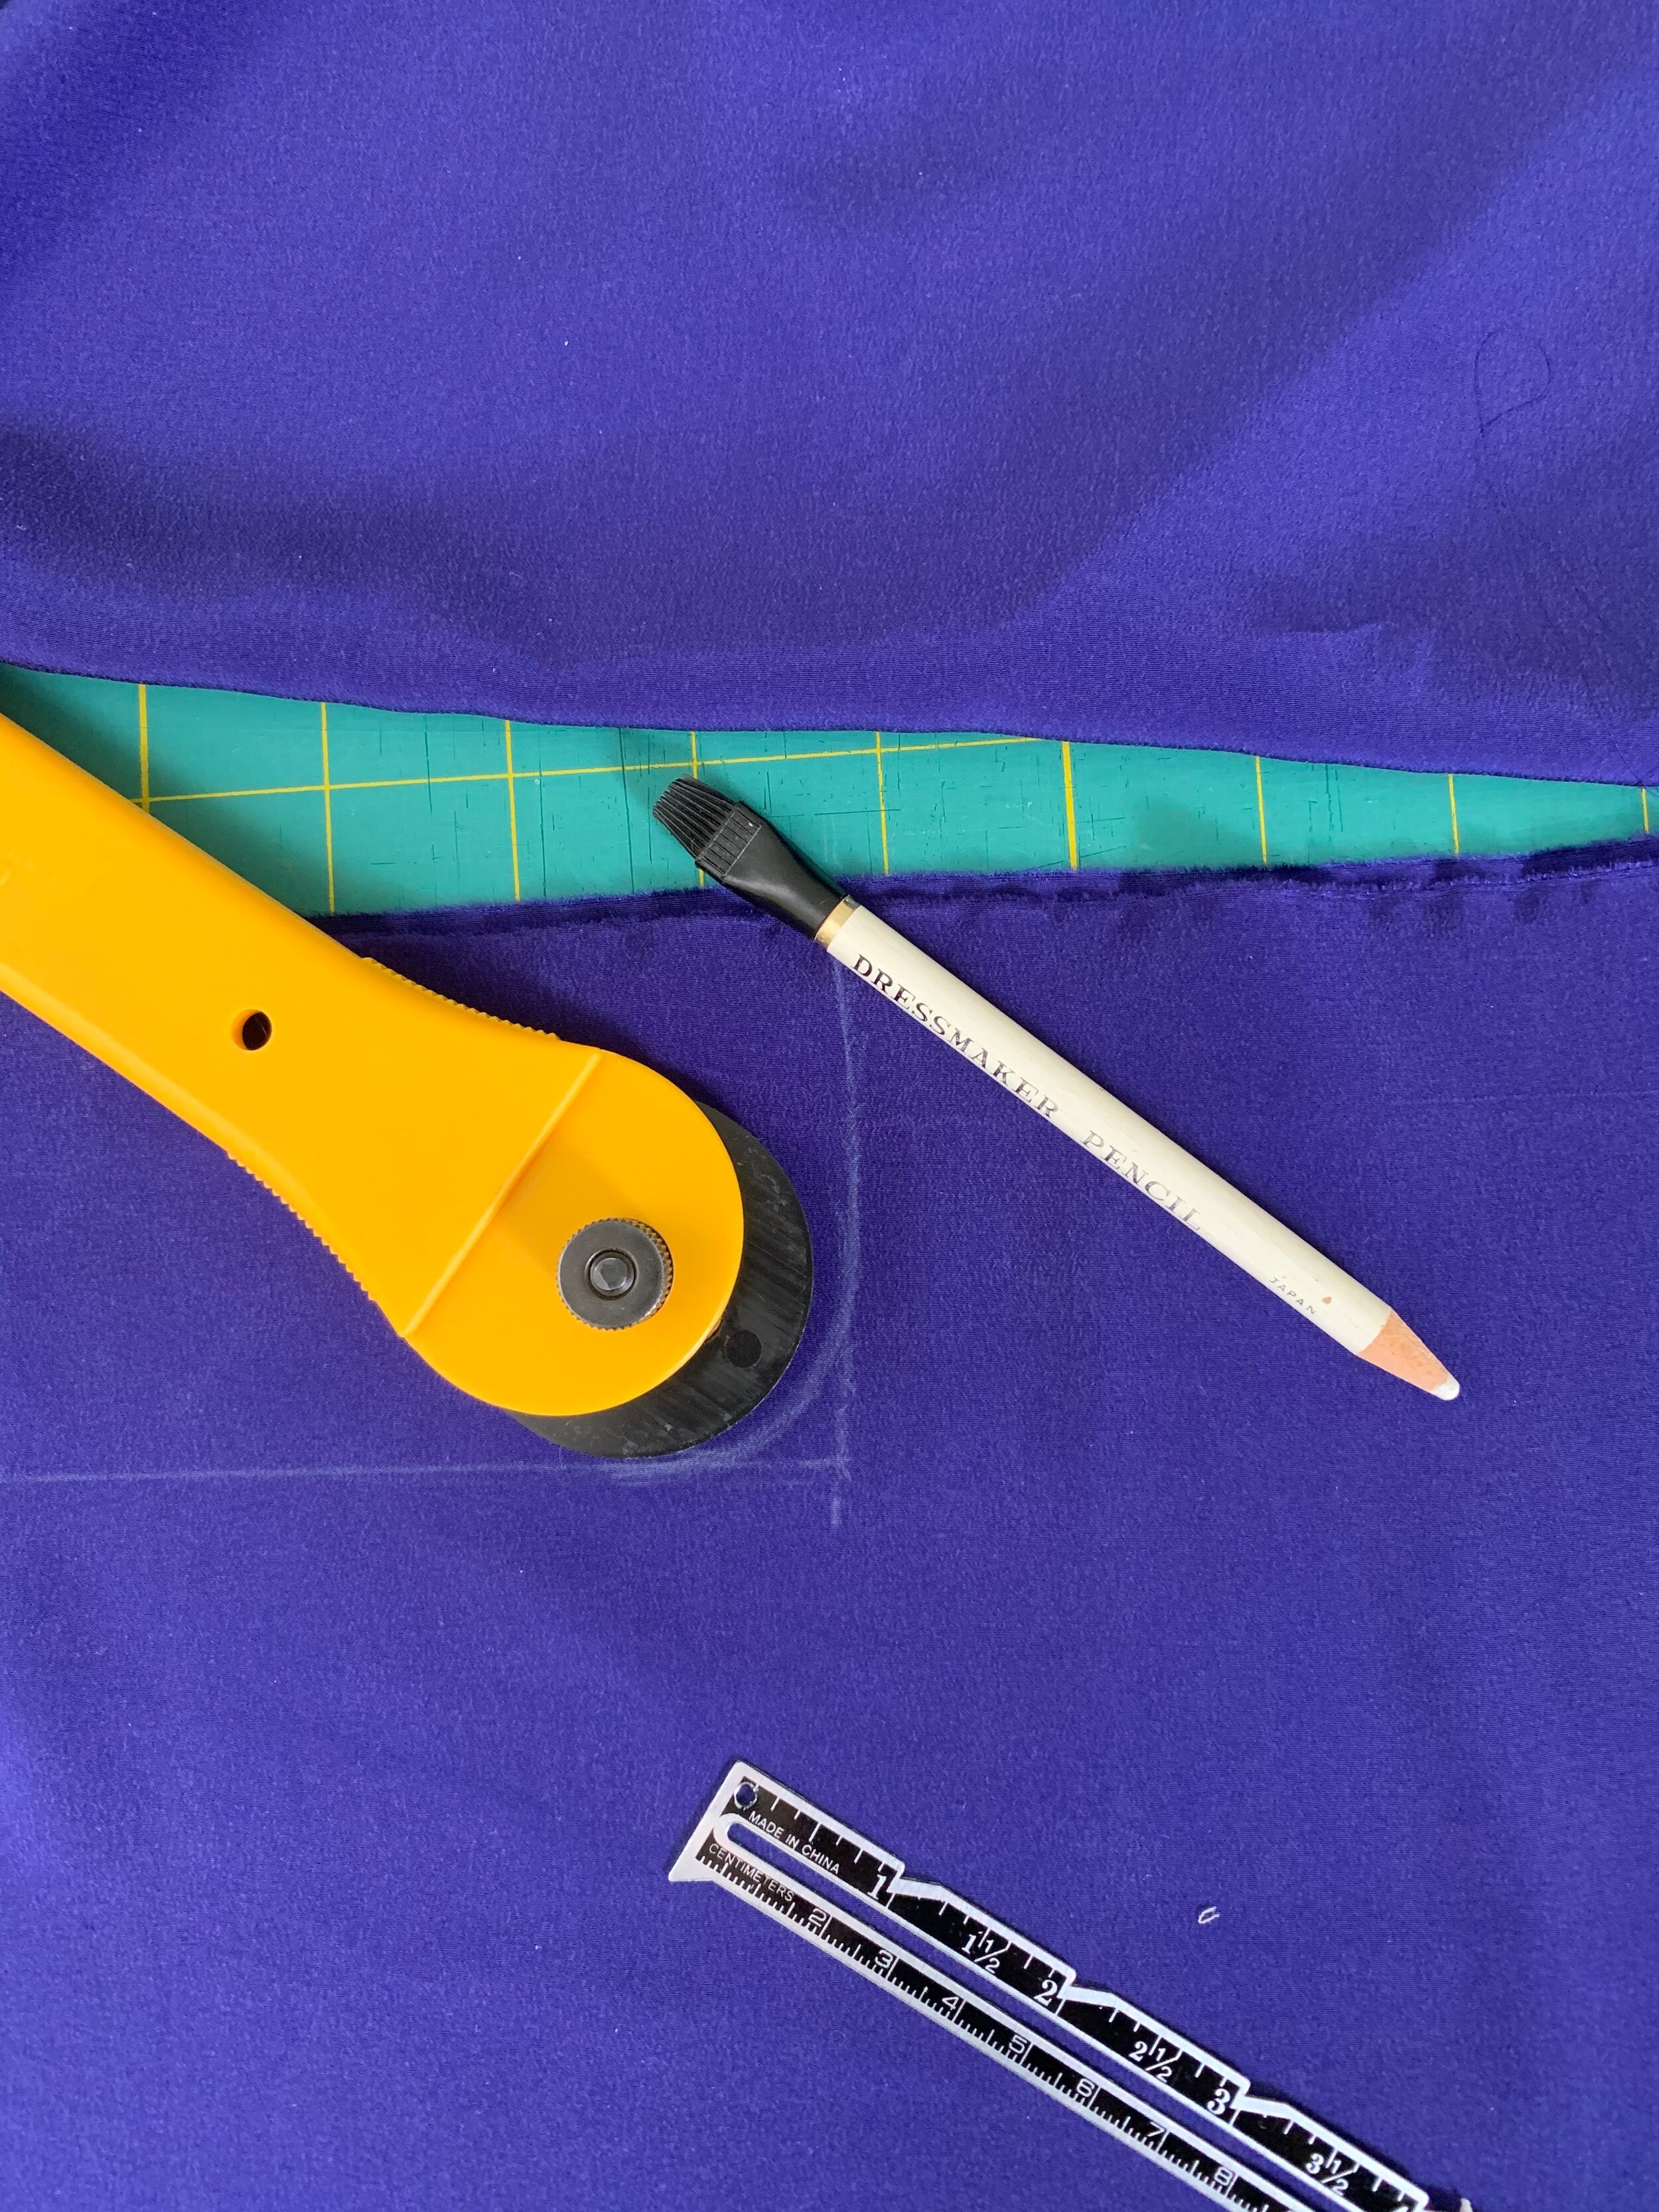
To begin, this top is cut across the fabric, with the selvedges at the top and bottom-which took me a minute to get my head around. This also means that you need a perfectly straight cut edge on both ends of the fabric. A tall order! Here is where I thank the fabric fairies, because I was able to tear the silk fabric which is not only super easy and eliminates measuring another ten times ten times- it also guarantees a perfectly straight edge.

IMG_7365.jpg

Look at the start of a lovely tear! I snipped through the selvedge and tore the fabric for an easy peasy absolutely straight edge. Then, I lined up the two pieces selvedge to selvedge for cutting as instructed.  Liz’s instructions and measuring guidelines are very clear. The actual pieces generally require drawing straight lines which is a snap with a straight edge.  For the one curve cut under the arm, I used my rotary cutter to trace a nice arc.

IMG_7368.jpg

The top was easy to put together once I puzzled out the pattern cutting. I made one slight modification- the instructions suggest using bias tape to finish the neck edge, but you need quite a bit of fabric to cut a self bias- and I was dealing with zero waste here.  The pattern suggests purchased bias tape but that wouldn’t be compatible with this silk.  So I created slim neck facings from the scraps.  I added a very light interfacing to the neckline facings- using interfacing scraps of course to stay on theme. I attached the facings and under-stitched them in place. I actually love a nice faced neckline.

FullSizeRender (1).jpg

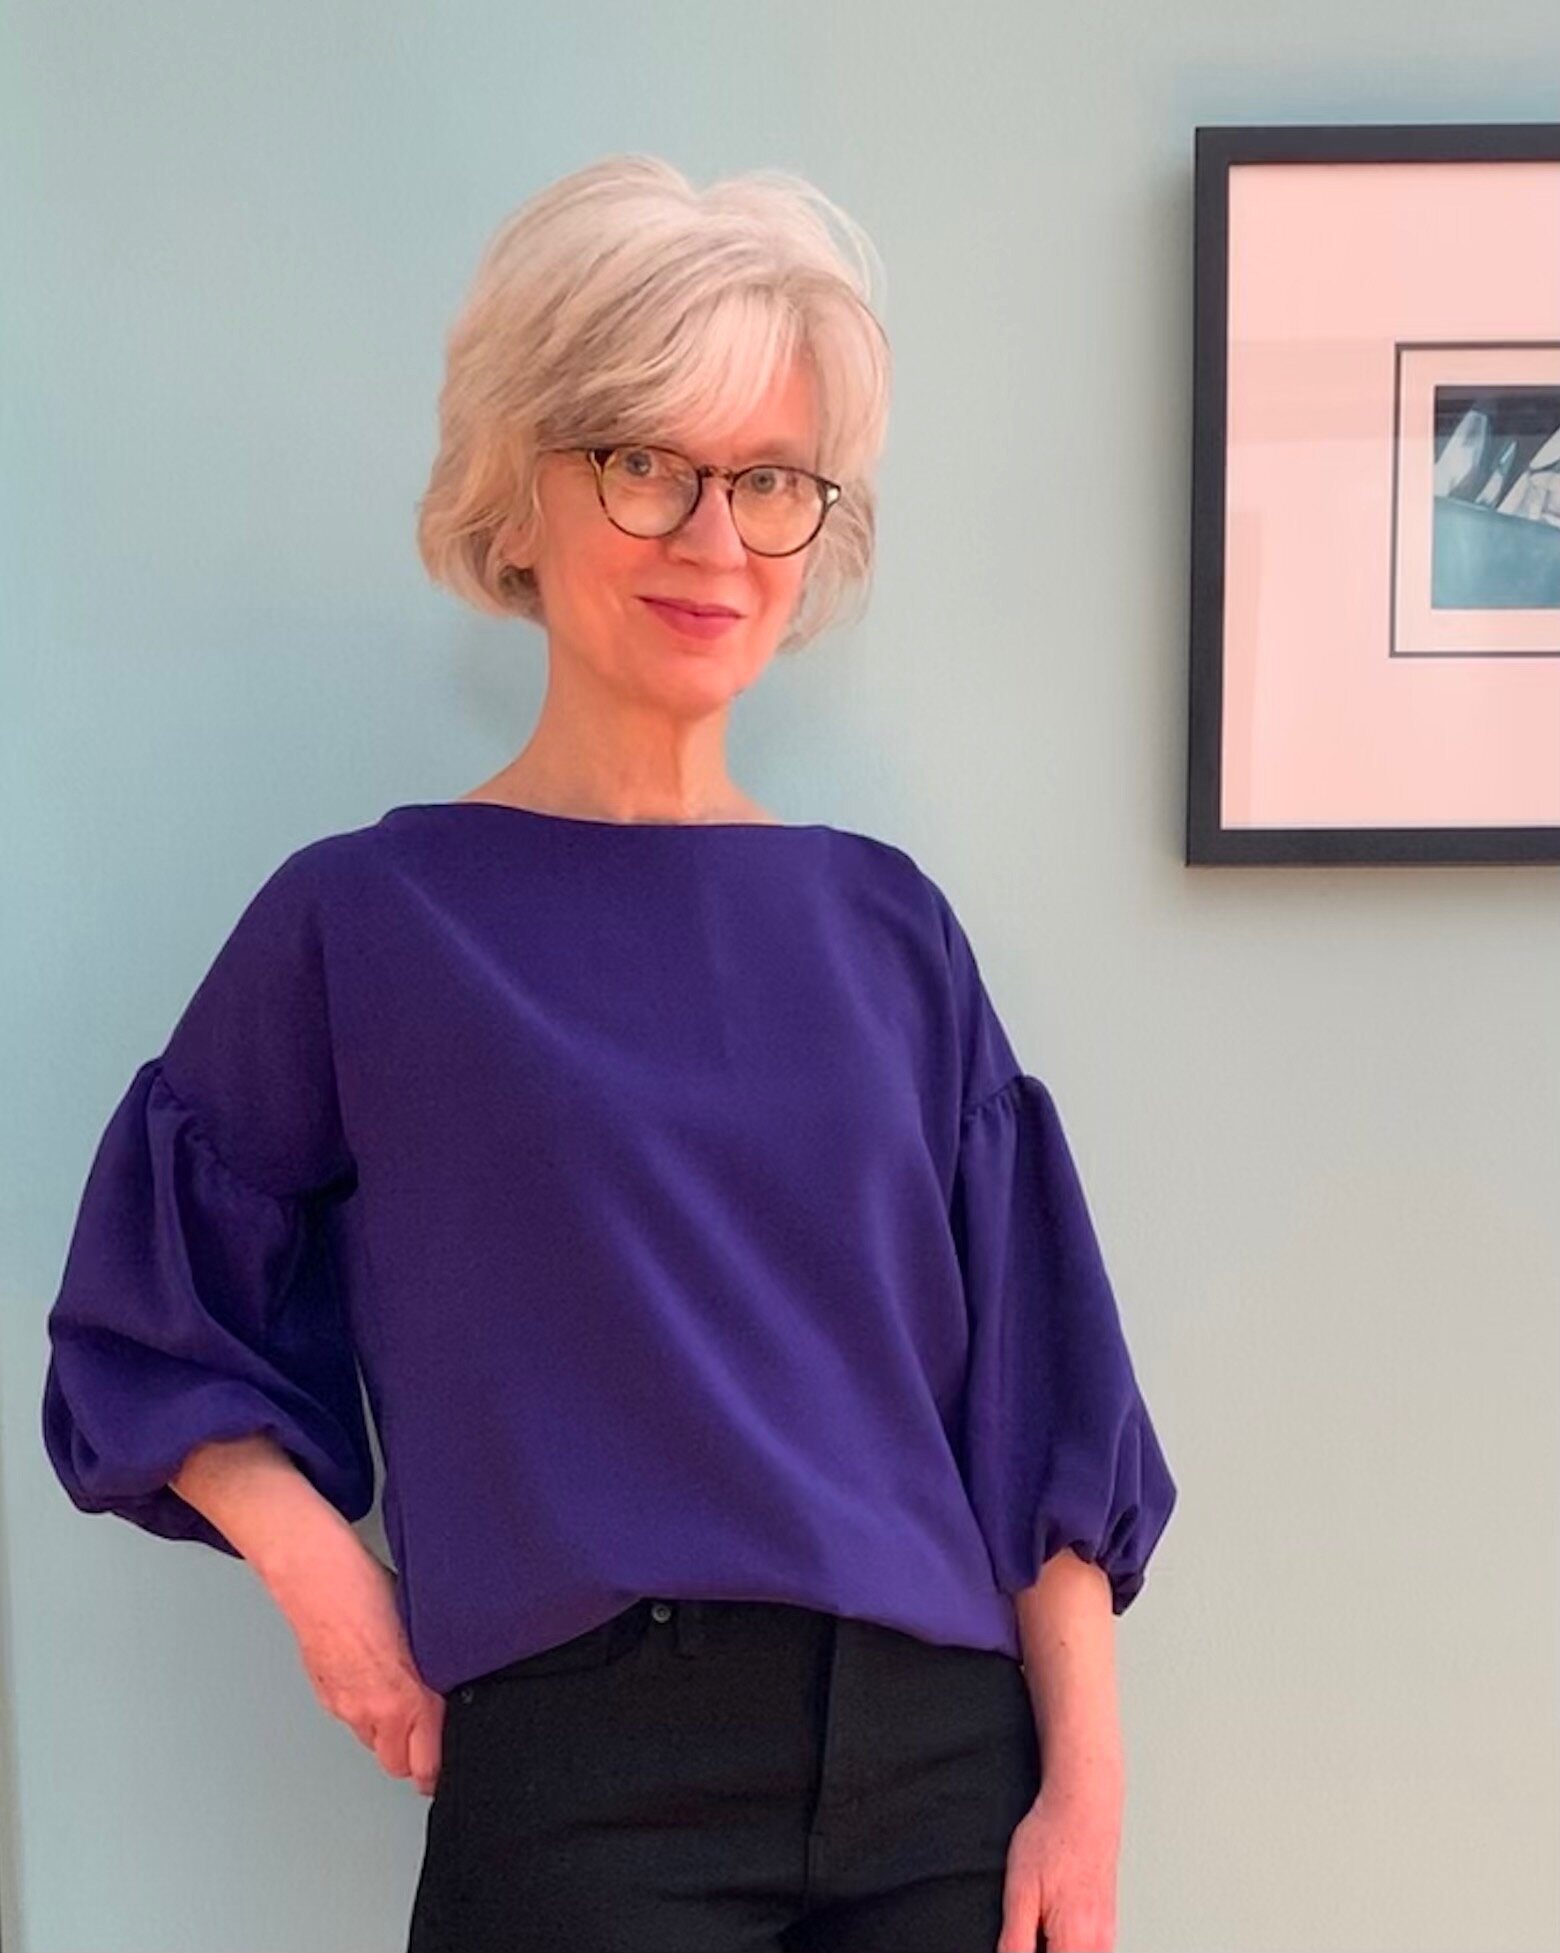
For a zero waste pattern, this top packs plenty of style- especially the pretty (always flattering) boat neck and the sleeves.  I love how this looks in this swishy silk.

FullSizeRender (2).jpg

And as an appropriate finale to round out this little Canadian friendship project, my planned mini winter holiday just happened to take place in Grand Marais in Northern Minnesota.  While hiking in Grand Portage state park, only an icy river separated me from Canada! You can see Canada right behind me- Bonjour Hélène! Someday the borders will open again and we can meet in real life.

FullSizeRender (3).jpg

Little black dress with a little extra

Even though we are still in stay safe at home days, I can’t help making something destined to go “downtown” whenever that time rolls along again.  I was trolling for black dress inspiration on the internet when I came across a fetching designer shift dress.  I knew I could squeeze this model out of a modest amount of a beguiling black fabric I purchased ages ago and- more important -I knew I could get pretty close to replicating the designer dress using a couple of old and reliable Vogue designer patterns I already owned.

IMG_7362.jpg

 The body of the dress is cut from my absolute favorite pattern- tried and true Vogue DKNY 1809 shift dress pattern.  I lost track of how many times I’ve made this; I use this pattern as a jumping off point for countless projects. I was able to replicate the uber cool neckline by using another Vogue designer dress pattern of the same vintage- Vogue 2538. This pattern is a Vogue Paris Original and the designer is Claude Montana -a French designer popular in the 1980s and 1990s. Vogue designer patterns always have that extra something- it may be subtle but it makes a garment standout.

FullSizeRender.jpg

 This fabric is a designer dead-stock with a mystery fiber content.  It is definitely a synthetic and looks like a double knit.  I have never worked with a scuba knit, but based upon scuba’s described characteristics, my fabric potentially could be a scuba.  The adjectives “spongy” and thick definitely apply.  Here’s a close up of the cool honeycomb texture and the trims. 

IMG_7364.jpg

The Vogue is typically lined which gives clean armhole and neck edges.  However, I typically don’t line knits because you need a lining with stretch.  Also, this beefy knit fabric has a comfortable and smooth backside, so I decided against a lining.  The collar finished the neck edge, but I needed to finish the armholes.  My first idea was to use armhole facings out of the same fashion fabric, but after sewing them in, I found the facings to be too bulky.  I took out the facings and finished the armholes with simple purchased black bias binding.  I hand tacked the binding down around the armholes for a tidy finish.

I was drawn to the subtle trimming on the designer inspiration dress.  Garment embellishment is rare for me.  Truth be told, I err on the plain and simple -maybe…uninteresting approach to dressing.  In fact, my middle daughter once pointed out that my chosen dress for an event was “just not very beautiful”  - Admittedly, she was a preschooler and my outfit didn’t include glitter, jewels, or any other sparkles- to top it off, it was black- not even a color!

 We all have our adornment comfort level.  Black on black and a little bit of gold is a safe choice.  It was a fun little journey looking for the black trim and horsey hardware.  I recognized the black braided trim, but didn’t know what it was called.  A little search on Etsy revealed this particular narrow braided textured trim is called gimp.   I did a little more looking and learned gimp was traditionally made of silk, wool or cotton, but these days, it’s mostly synthetic- polyester.   I was familiar with gimp used as trimming for traditional furniture and curtains and clothing- I was amazed to learn it is a longstanding adornment- it has been embellishing textiles for over five hundred years!

 I was momentarily stumped as to how to search for the gold equestrian looking trim piece.  After poking around- again on Etsy- using horse jewelry as a starting point, I found the perfect gold plated “snaffle bit”- another learning moment. while I still am a bit uncertain what this actually is, I know it looks spiff on this dress.

unnamed.jpg

Four Fennel Fanny Packs

The Fennel Fanny Pack by Sarah Kirsten is a charming, functional little pouch that I have been eyeing on social media, and my middle daughter requested I make for her at least a year ago.  It takes extra effort and motivation for me to tackle sewing projects that are not garments.  A great Christmas gift idea is a pretty good motivator, so in December, I decided to go big and make the fennel fanny pack for all of the young adult women in my family.  I sewed three in succession, and – embarrassingly- I made more than one major blunder while constructing each and every single one.  I am not adverse to unpicking a seam, but I mortified myself for the cavalcade of mistakes on each of them.  I eventually got them all done and delivered to everyone’s delight.  You would think that would be end of story.  But, still smarting from my mistakes, I decided to try this pattern again.  It is January and dull, and I broke my arm and it’s hard to try on clothes and the world news is dismal or worse.  So, I challenged myself to make a fourth fanny pack without having to rip out any seams.  The challenge reward is a fanny pack for myself which would be incredibly useful in my present one arm state. 

FullSizeRender (1).jpg

Challenge results- I had to rip out a few stitches here and there- but not total seams- as was the case in the first three makes. So, I consider that a win.  The real win, however, is a fabulous little fanny pack for me.  Here are my recommendations for mistake free fennels.

FullSizeRender (2).jpg

I used lovely Rifle Paper Co. cotton linen canvas fabric from Lakes Makerie for the exterior and a quilting weight cotton for the lining.  I interfaced all pieces with Pellon light-weight sew in interfacing, and I ordered this webbing clasp package.  I also used Wrights double fold seam binding .25 inch wide.

Tip number one to make assembly easier- use regular nylon zippers in the 7 and 12 inch lengths recommended by the pattern.  It’s just plain easier measuring and constructing and safer for your sewing machine needle. 

Number two and most important- read and follow the instructions.   My bad, but sometimes I get ahead of myself in sewing or decide I should do things in a different order- the hazard of being a long time sewist and thinking I know what’s going on.  Well, with this sweet little pack, I actually didn’t fully understand the construction, so I should have simply FOLLOWED THE INSTRUCTIONS.  The instructions and diagrams are very good, thorough and clear.  I understand some people have trouble with diagrams in two dimensions.  SewNorth has a good tutorial here with photos to accompany all the steps.  This is a good resource for those who are more visual learners.

Number 3- or where I previously screwed up.  If you are using a print, double check to make sure your print and zip openings line up directionally- you want both zips to start on the same side of the pack.  I am right handed so I determined the zips would start on the left when wearing the pouch.

IMG_6140.jpg

Number 4- Measure accurately and use the 3/8 seam allowance as directed for all seams.  However, for the zipper installation, I used a ¼ inch seam allowance.  That seemed to leave the right amount of zipper exposed and worked best with overall fit.

IMG_6141.jpg

Be sure to clip the corners on the main panels- step 21- this of course is essential for fit.

IMG_6144.jpg

Number 5- Add the binding after the main panel is added- after step #22.  This is the only time I strayed from the order in the instructions.  It is worth it to wrestle with the bias binding even though it is a struggle.  It might be worthwhile to make a wider binding- say 3/8 inch.  If you are going with pre-packaged, the .25 inch narrow binding is the most appropriate size.  I trimmed the seams a bit especially the corners.

IMG_6145.jpg

Happily, the fourth fennel was almost effortless.  I enjoyed making this one so much, I already have plans for another.


A Kalle Shirtdress and a sense of proportion

 I feel pretty confident in my ability to get a garment to fit- I have been working on that for years and getting a good fit is really one of the big reasons we sew.  But, what do you do when the style trend is oversized?  I am constantly drawn to oversized and chic easy looking styles – particularly this year when I seem to seek comfort wherever I can find it. Despite the attraction, once I put a finished oversized project on, I feel a bit overwhelmed, and I often find myself scaling down an oversized pattern to become more of a fitted pattern.  I used to think I couldn’t do oversized because I was short- but I have learned that is not the reason.  There are plenty of petite women who rock the oversize trend and at 5”4” I am technically not considered petite.  Truth be told- I tower over all of the other women on our block.  Seriously I feel like a giant in my neighborhood- it’s weird.  Proportion isn’t just about height.  There are other considerations such as long legs or long body etc.  The trick is to get the proportion mix right.

FullSizeRender (5).jpg

I was sold on an oversized and easy look for this Kaufman mammoth flannel purchased from Lakes Makerie.  This fabric is soft, thick and heavy and oozes comfort. One thing about plaid flannel is you have to consciously avoid potential pitfalls.  Potential pitfall number one: avoid looking like a lumber jack- even though it is an iconic look here in Minnesota.  Pitfall number two: try not to look like I’m wearing the spouse’s flannel shirt.  That look is chic on young cool girls but often young chic fashion looks simply won’t work for me.  Finally, I didn’t want to look like I am ready for bed- even if that is more often true than not.  That said, I wouldn’t mind feeling like I am heading to bed, just not looking like that’s the case.

FullSizeRender (4).jpg

I decided to make the Kalle Shirtdress by Closet Core Patterns with long sleeves.  This is a slightly oversized style with dropped shoulders and lots of ease through the body. I have my all-time favorite tried and true shirt dress pattern blogged about here and here, but this pattern is closer to the roomy, comfy look I was going for.  I cut a straight size 4 which is the size that matches my bust measurement. I did not grade out for waist and hips as I would need to do for a tailored style. There is plenty of fullness in this pattern, and I actually reduced some of the back fullness with a narrower back pleat.

This plaid is balanced which makes pattern matching so easy- but I still am pretty proud of my placket.  It took more than a little thinking. I kept the placket simple without buttons- not because I am lazy- but to keep it clean and unfussy.

IMG_4401.jpg

You will notice bracelet length sleeves, which I admit up front are a big measurement mistake.  However, I usually roll up my shirt sleeves because even when I am at my desk- there is a lot of hand-washing in a day and I hate soggy cuffs.  So these bracelet sleeves might actually be a genius design feature.  And for some reason, I like the proportion.  So maybe I got the proportions right?

FullSizeRender (1).jpg

A riff on a jean jacket: Vogue 1644

I totally get the compelling reasons to own and wear a classic jean jacket: it’s timeless cool kid style; it’s high-low versatility; and it’s season spanning powers. I have dabbled in jean jackets in the past and owned and worn a few- the best one was purchased second-hand when I was just out of University and living uptown.  It’s been a minute since I had a denim jacket in my closet, and with the change of seasons approaching, I thought long and hard about making one as I continue towards my goal to create a mostly handmade wardrobe.  But, despite the allure of the traditional jean jacket, and the brilliant and tempting patterns here and here, I went down a slightly different jacket path with Vogue 1644.  I decided to make something that would be kind of a cross between a denim blazer and denim jacket.

IMG_1808.jpg

My unorthodox idea was not popular in the family.  Both adult daughters expressed disapproval when I sent them a pic of the nearly finished jacket asking about button choices. A big thumbs down -and I think they used the word matronly. Hmmmmm- matronly defined is “a staid and conservative older woman". I admit I lean conservative in dressing, and I am an older woman. Perhaps I should not be put off by that word. But let me point out- in real life, as an advocate for people experiencing homelessness and previously working to provide health care for individuals without insurance, I am staunchly liberal in my point of view.

IMG_1786.jpg

In any case, their comments were not as troublesome as my hassles with top stitching.  In this jacket mash up, I went with traditional gold buttons for that blazer feel and decided to add top stitching in gold thread to match and to evoke jean jacket style.

IMG_2213.jpg

 I used two gold threads through the top needle for a pretty perfect traditional topstitch color.  Because this jacket has a fold-over collar, the topstitching shows from both sides in front.  So I wound a bobbin with two threads, knowing I was playing with fire- and gave it a go but that was a messy disaster.  So I went back and used one thread in the bobbin, the recommended way.   But I had to pick a point midway up the bodice topstitching to stop and turn the piece over so the thread would show on top.  If you look closely you can see the turning point.  Not terrible, but not ideal.

IMG_2810.jpg

The pattern calls for finishing the facings -shown below -with bias trim.  I finished the back center seam with a mock flat felled finish which looks spiffy with gold top stitching down the back.

IMG_2809.jpg

This is a well drafted pattern.  The collar is perfect and I really appreciate the two piece sleeves which are so comfortable to wear.  This jacket is drafted with plenty of room in the bust.  I am actually much better suited to the traditional tomboy jean jacket fit, and this jacket probably has too much ease in the bust for me- not terrible, but not ideal.

IMG_2751.jpg

The sleeves are also surprisingly short.  I only had room for a narrow turn under and top stitch which is never the case.  I almost always have to shorten the arms in a big three pattern.

The youngest daughter softened her disapproval a bit, once I style the jacket, but the middle daughter was not swayed.  I am not surprised because she is a devotee of the classic jean jacket and probably considers this riff a bit of a sacrilege. And actually, this denim jacket is so useful and versatile, maybe I could use a traditional jacket too!