A denim worker dress- Butterick 6655

Because May Day 2019 is both international workers’ day and an office work day for me, this past weekend, I made a denim worker dress.  Denim is a workhorse of a fabric and appropriate for the tough jobs.  We all know and love denim for many reasons: it is perfect in all seasons, washes and dries and ages to a beautiful patina, goes with almost everything, and it’s blue.  This particular denim has some stretch which gives it even more super powers in my book.  Denim fabric is easy to track down.  I found this fabric at Treadle Yard Goods

IMG_4841.jpg

I snatched up this new Butterick pattern in a hurry during a pattern sale because of the appealing asymmetrical buttoning.  I didn’t realize it was actually a faux button-up- until I cut out the pattern!  Completely my fault for not reading the pattern description which clearly discloses this is a mock button front.

IMG_4844.jpg

Button fake out!

And even though I was initially a bit disappointed by the mock button trick- I am super pleased with this pattern and results.

The fit was perfect.  Because this dress is a simple shape, I could do a quick comparison to my trusted dress (makeshift) sloper and determined this dress would fit well- and it does.

IMG_4902.jpg

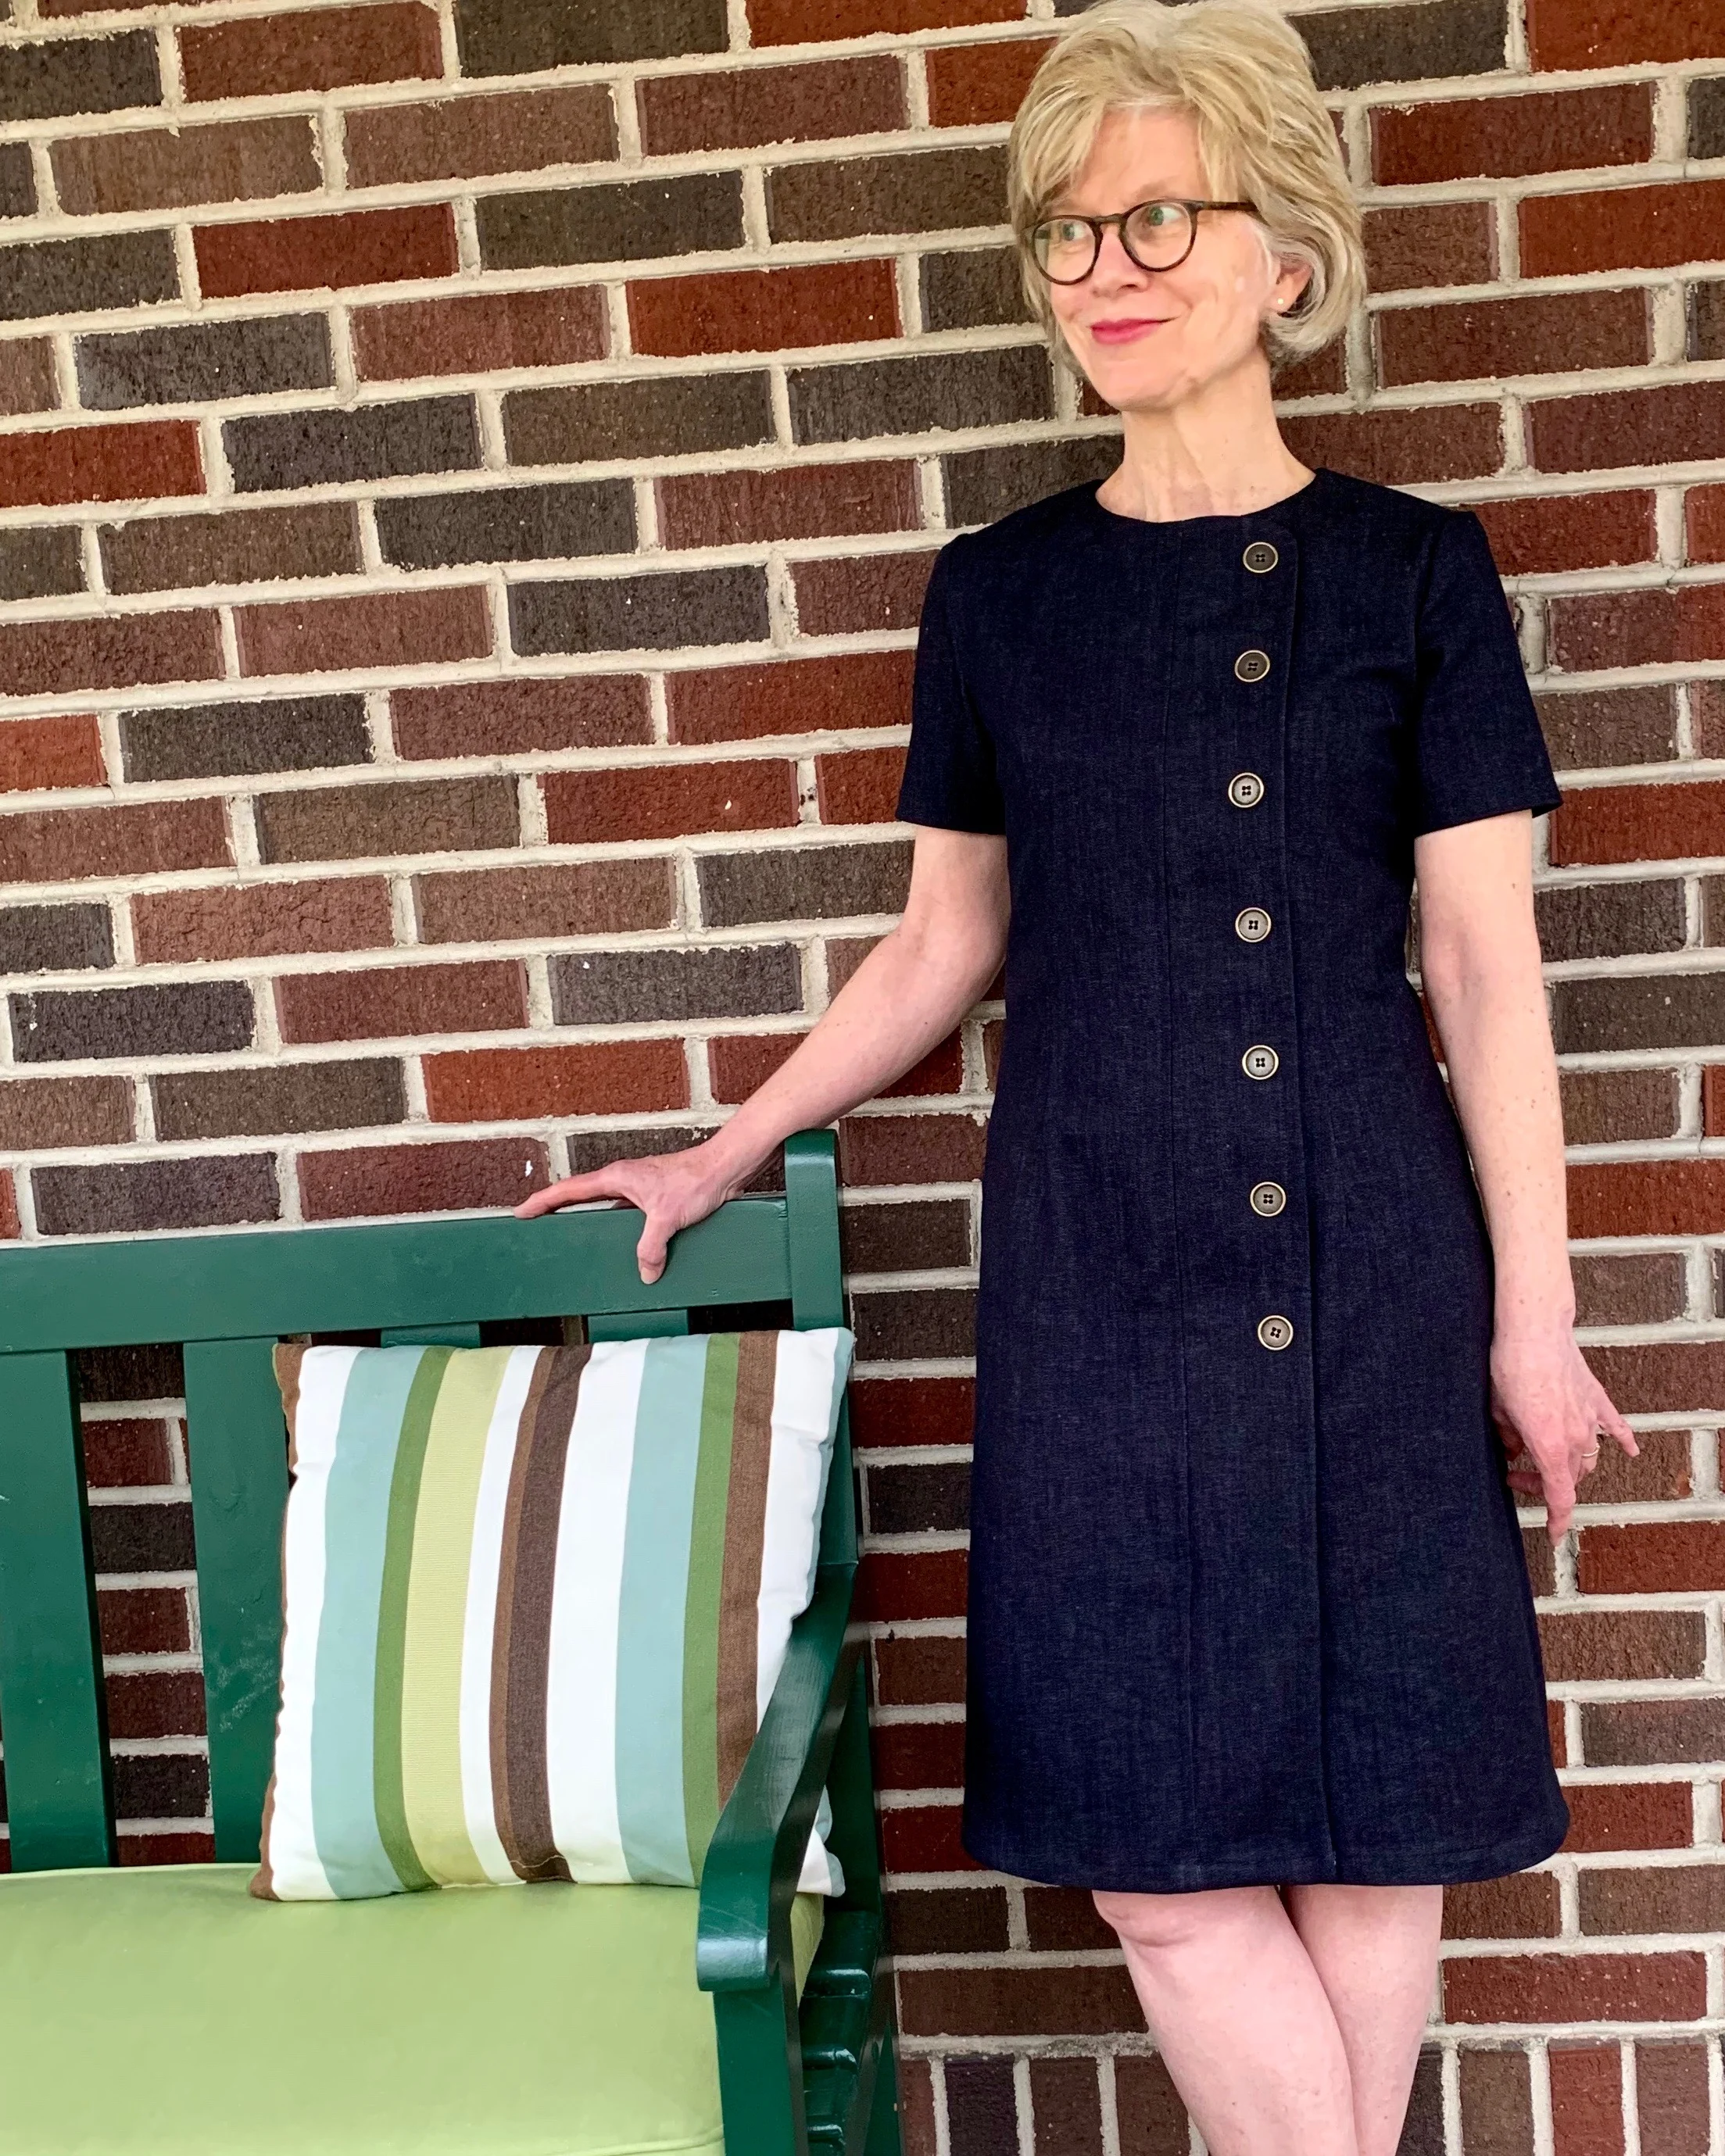
I made absolutely no changes to this pattern- which is unusual for me.

I envisioned sturdy brass worker buttons and after some hunting- tracked them down at JoAnn.

IMG_4801.jpg

Liberty for Spring

Wow- it’s the middle of April, and we were assailed with another snowstorm! The only rational response to Thursday’s thunder blizzard was to sew a mood brightening dress in cheery Liberty print. 

IMG_4357.jpg

I keep a modest amount of Liberty fabric on hand for similar emergencies.  I recently purchased this happy print from The Fabric Store during their Liberty sale.  I’ve made a fair amount of Liberty print button downs over the years- but an April snowstorm required a more significant floral response. 

This was a super quick project.  I used Simplicity 8295 with minimum hacking.  I added a back yoke facing- not called for in the pattern- but pretty essential in my book.  I simply cut two back yoke pieces instead of one.  To attach the yoke and facings, I follow excellent instructions from Grainline Studio with two options for yoke facings; the first is here and second option here.

IMG_4579.jpg

The only real change I made was to shorten the front band which originally ended at the waistline.  I shortened the band to mid chest.

IMG_4344.jpg

I cut a size 6 at the top- and the shoulders were plenty roomy.  I graded the waist and hips to a size 10 - all the better for biking! I also added 2 inches to the front and back hem length. 

IMG_4393.jpg

Yes- that is snow behind the small green plants!

Getting fancy with Vogue 1809

The invitation called for cocktail attire!   Whenever I am stumped for a fancy dress, I fall back on the most excellent Donna Karan Vogue 1809.  This pattern – now sadly out of print — has been my reliable go to when I need a dress for weddings and parties. The remarkable Vogue 1809 enjoys quite a following and has been lauded by many sewists- including Sarah Gunn at Goodbye Valentino. 

IMG_4095.jpg

Obviously, the dress is perfectly and simply drafted and the cut is classy.  I have made it with and without the open ended darts in the front and the back.  It always looks fabulous.  Bonus- this Vogue dress pattern requires minimum fabric- so those spendy special occasion fabrics are an option.  I found this rather special embroidered floral mesh fabric at my local fabric shop -Treadle Yard Goods.  This type of fabric is pretty easy to track down and is available at several price points.

IMG_3999.jpg

I puzzled a bit over how to work the border design mesh into this dress.  I landed on a simple blocked bodice design.  Embroidered mesh could come across as an exclamation- and I wanted to tone it down a bit.  The plain bodice is an easy pattern modification.  It also was a genius comfort move- because the mesh is scratchy.  The bodice was easy to draft. For the bodice and lining, I used a nice -but simple- cotton because -again- I wanted to soften the overall statement.  Even if I go dressy, I like to stay grounded. 

IMG_4006.jpg

I debated over the construction- because the mesh is tucked into the bodice seam, I wasn’t sure if I should line the dress or sew the mesh and lining as one piece.  In the end, I cut out the embroidered mesh and the lining and sewed them as one piece. I know this seems like the easy route- but sometimes the easy path also provides the best outcome.  By encasing the seams within the lining, there were no seams showing through.  And the darts easily became invisible- love that.  I also eliminated the front double ended-fish eye- darts, although I kept the back double ended darts for subtle shaping.

IMG_4091.jpg

Below you can see how I worked the border design from the hem- so the flowers are “growing” up from the bottom of the dress.

IMG_4097.jpg

Letting the fabric do the heavy lifting

I know I have already discussed my love of a shift dress. But, this is a recurring theme with me. I did some quick research and learned the origin of the shift dress is the 1920’s flapper dress. A shift dress falls straight from the shoulders, has a short length and the only shaping is darts around the bust-making it easier to “dance and move.”  This was a dramatic departure from the corseted styles that preceded it.  The shift dress was revived in a big way in the 1960s. You can find plenty of shift dress warnings:  Avoid looking like a paper bag!  Don’t go too loose or too tight!  Don’t be boring!  But, I say- no need for caution! The shift dress is super versatile and is still the perfect wardrobe choice for a modern lifestyle. I also favor this as a simple one and done wardrobe choice.

IMG_3846.jpg

For this shift dress- the fabric does all of the heavy work.  This beautiful cotton woven with a repeating zig zag border makes this simple, straight-forward dress memorable.  Note the pattern is woven in- not printed- which gives the fabric extra soul.  The fabric is not tightly woven- but this also lends to the craft-like feel.

IMG_3876.jpg

As I discussed previously, I favor a slight A-line shape and this dress is a true shift falling from the shoulders with bust darts.  The only real work for this project was in the layout.  Pattern placement took some forethought to ensure the horizontal border placement was optimal.  It took a bit of draping, and head scratching, but I think it worked out.

IMG_3864.jpg

For this shift dress I used my tried and true Simplicity Cynthia Rowley 2584 pattern-now discontinued and modified the neckline and the sleeves.  It might seem like trouble to fiddle with those details- but I know the overall cut and shape are right- which makes minor details easy to sub out.

Once the pattern was placed and cut out- it was such a quick and satisfying make.

Style Arc Tully for the carry-on

Whenever we take a trip, I almost always sew something new.  Travel typically means a different climate and always means non-work wear clothes. So, I consistently seem to need something to fill a gap in my existing wardrobe.  That said, and as much as I have a closet full of clothes- I am truly a light packer.  For trips that last 5 days or less, I often just take a regular backpack.  For trips up to 10 days, I use my larger 55 liter backpack.  When we return home from an overseas trip- customs agents almost always ask me where my luggage is.  Ha! 

We recently had a very spontaneous opportunity to take a quick warm weather break.  I wanted/needed some light linen pants that would do double or even triple duty and be great for the beach and for sight-seeing and would provide winter white leg coverage and sun protection.  Important!

I had two days to get this done, I used the Style Arc Tully pattern that I owned – having made these up previously for my daughter.  I wanted simple elastic pants, and I appreciate the flat front and paper-bag waist features of the Tully. 

I found the perfect blue linen fabric from my local and fabulous fabric store: Treadle Yard Goods.

IMG_3499.jpg

Nicely pressed pants pictured above in my dining room and below while on delightfully warm holiday, all rumpled and beach ready.

IMG_2277.jpg


And yet another shot back home on the porch. Note, I modified the Tully because I wanted a loose wide leg.  This was simple to draft from the Tully. I simply drew a wider leg- following the grain line marking on the pattern- see second shot below. 

IMG_3364.jpg
IMG_3705.jpg

And, in conclusion, a short story about the face hiding handmade hat. This hat is self-drafted- I copied an REI brand hat that I have had forever with a perfect not too big, not too small, just right brim.  I used buckram inside the brim – but next time, I will use another layer -or find something even sturdier- for more stiffness.  All the better to see!


IMG_3488.jpg