Merry, bright -and WARM in a sequin Ruska Tee

What is the best antidote to a chilly and dark holiday?- something warm and bright obviously.  During our long, dark and chilly winters in Minnesota, I follow the northern European tradition of getting cozy with wool, lots of candles, twinkle lights, and a blazing fire at home.  Building on this strategy of combining light and warmth, I also created the perfect top for a frosty holiday at home –albeit somewhat by accident.


I planned to make a fancy top out of navy sequined stretch fabric purchased from Fabric Godmother last year.   I host extended family on Christmas eve and my go to hostess outfit is typically a party in a top.  The beauty of this plan is that I can prep everything and at the last minute, throw on a pretty top for the party.

So I dug out the sparkly fabric and was a little chagrinned to find out for some reason, I only bought a measly yard and a half of this fabric which pretty much limited my pattern choices.  But with sequins- staying simple is the best guidance- so I planned to use a tried and true Ruska tee pattern in Named Clothing’s Breaking the Pattern Book- it’s a tried and true “just right” tee- not too fitted and not too baggy.  It also works with both stretch and woven fabrics if you alter the neckline.

The sequin fabric required a lining, and as I was rummaging through my fabric stash for possible linings, I laid eyes on some merino wool from The Fabric Store and it clicked- I could be cozy and bright if I lined my shiny top in cozy and warm merino wool.

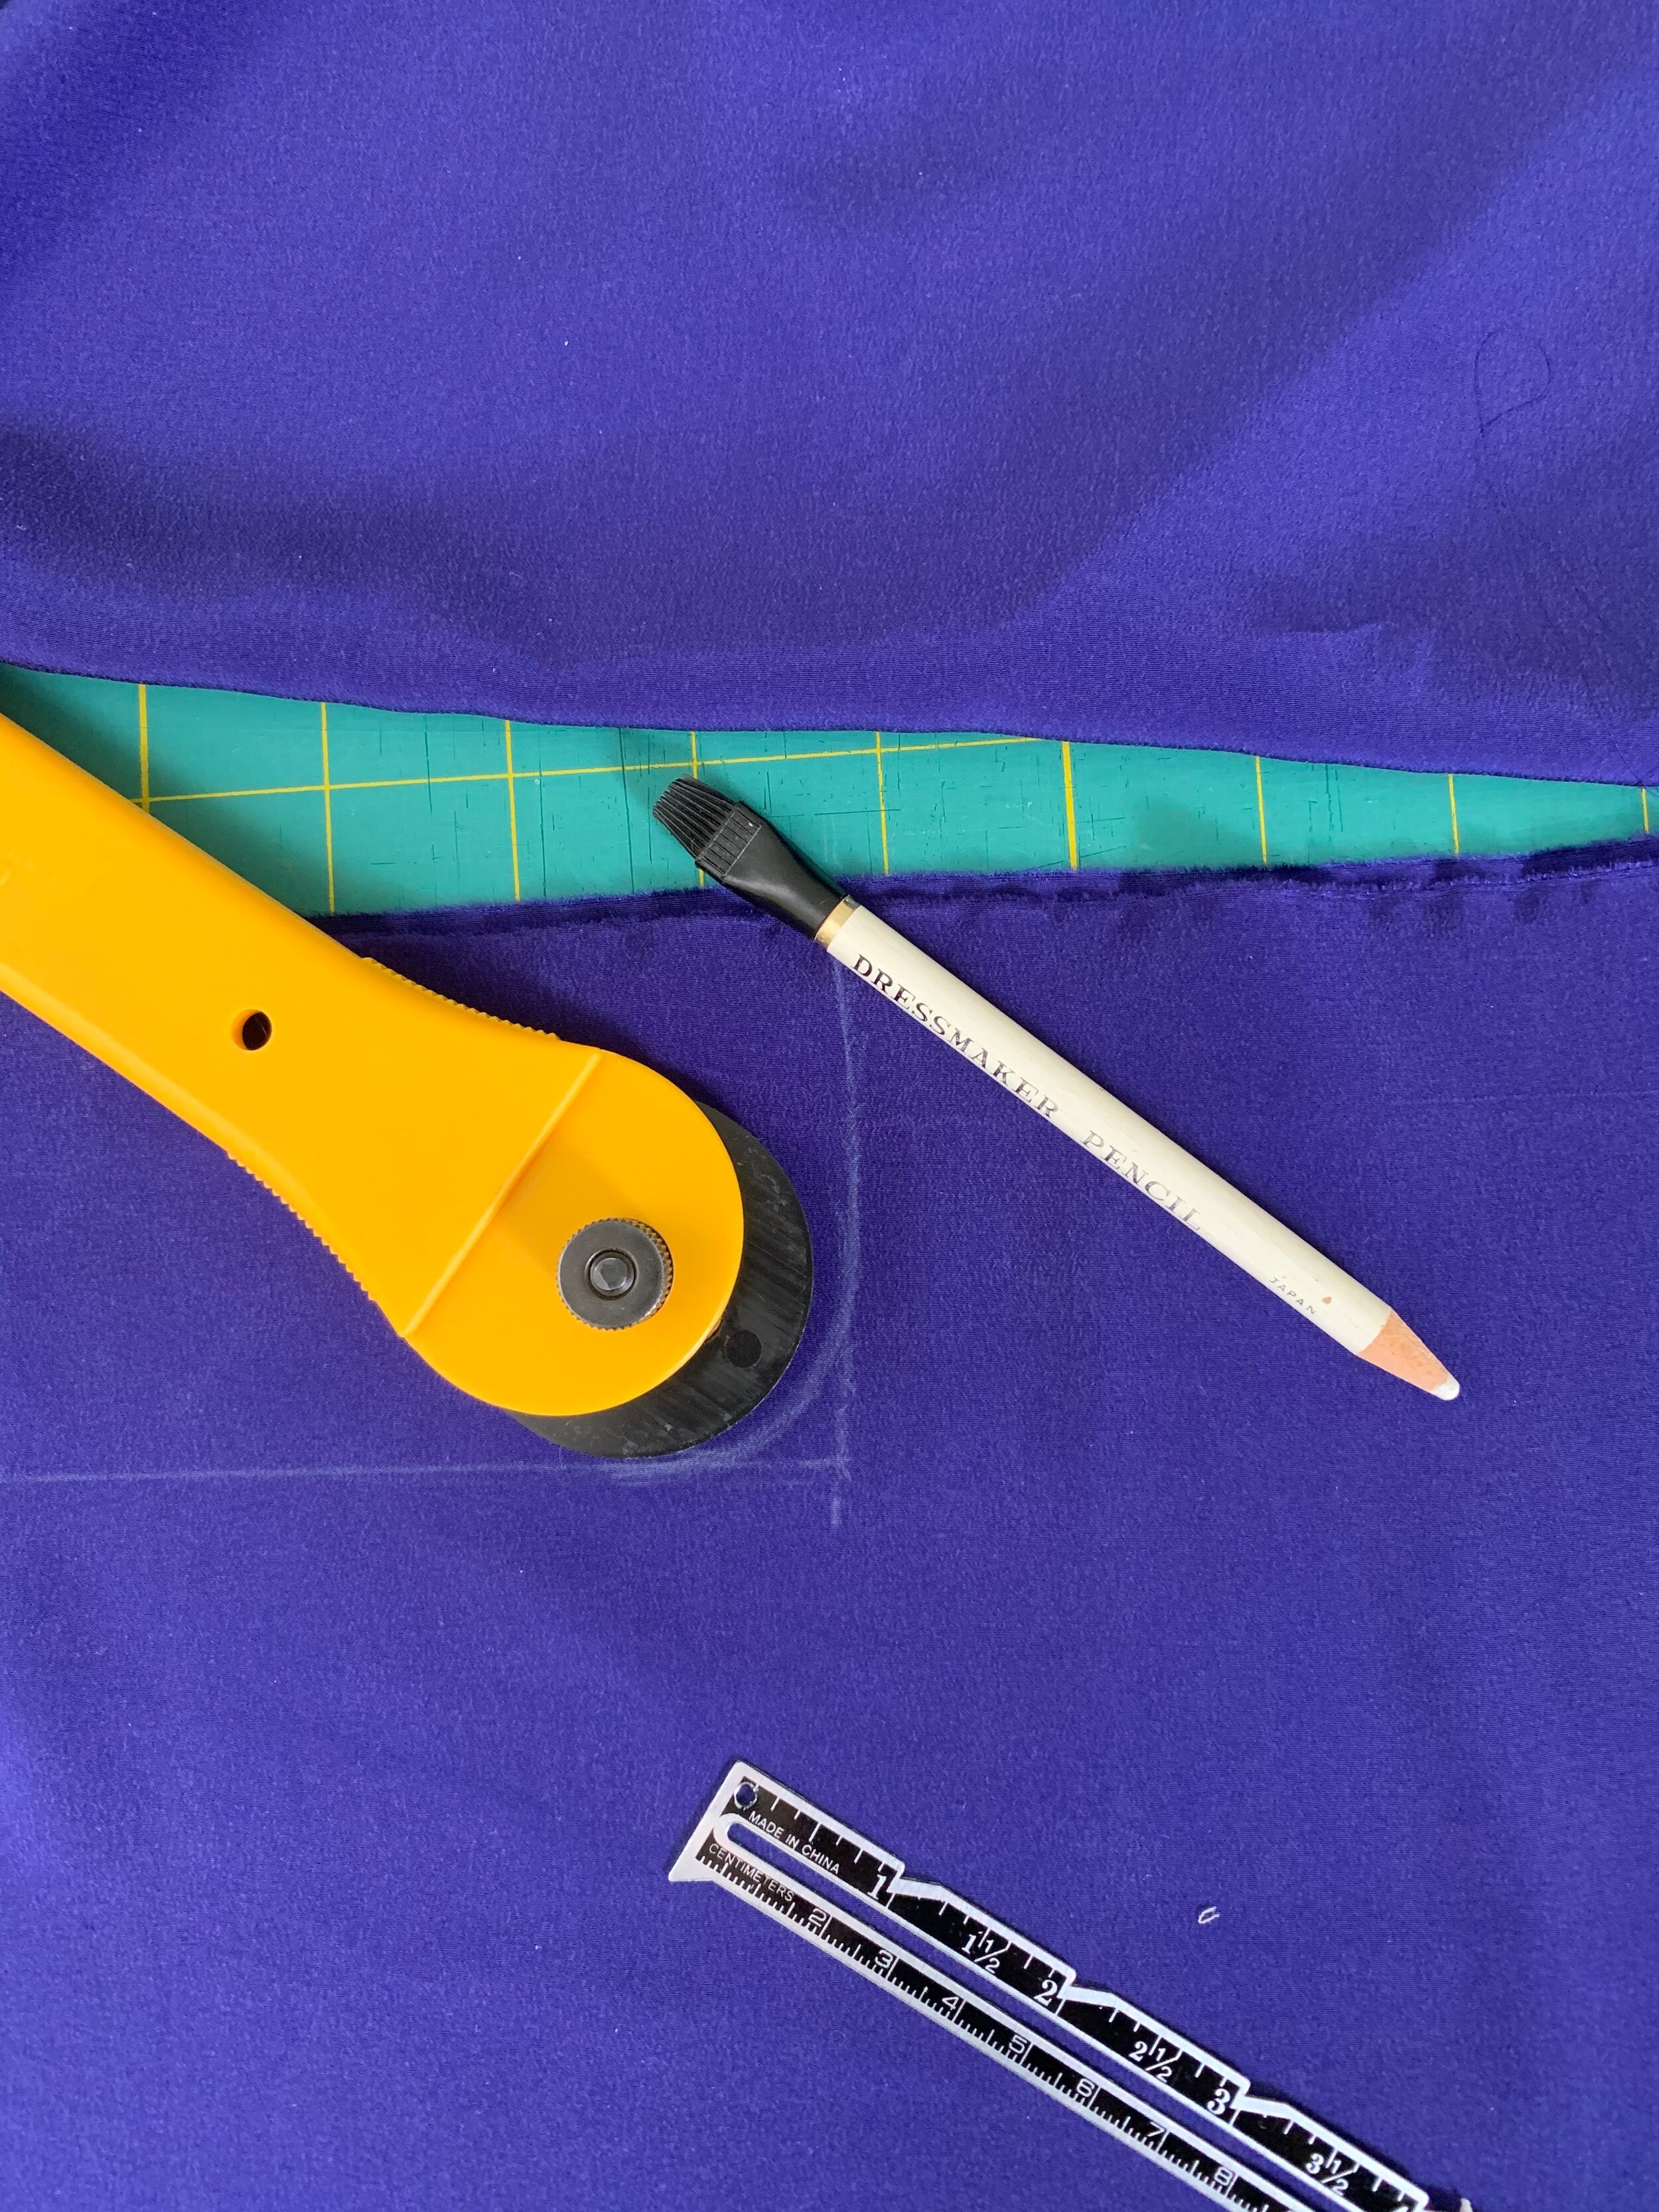
 Everything else about this project was easy.  I checked a few blog posts about sewing with sequins- see SewDIY’s post here and ByHand London’s post here.  Basically, there is either the careful or the quick approach to sewing sequin fabric.  You could remove sequins from the seam lines or you can put a jeans or heavy duty needle in your machine and simply sew.

It’s probably easy to guess which method I preferred.  I simply sewed through the sequins leaving a mini sequin storm in the sewing room.  I wear glasses so no worries about eye injury from flying tiny sequin shards that are created when sewing through the sequined fabric.  Also, just be aware that you will leave tiny sequin puddles for the first few times wearing it out from sequins that get busted and drop from the fabric with wear.

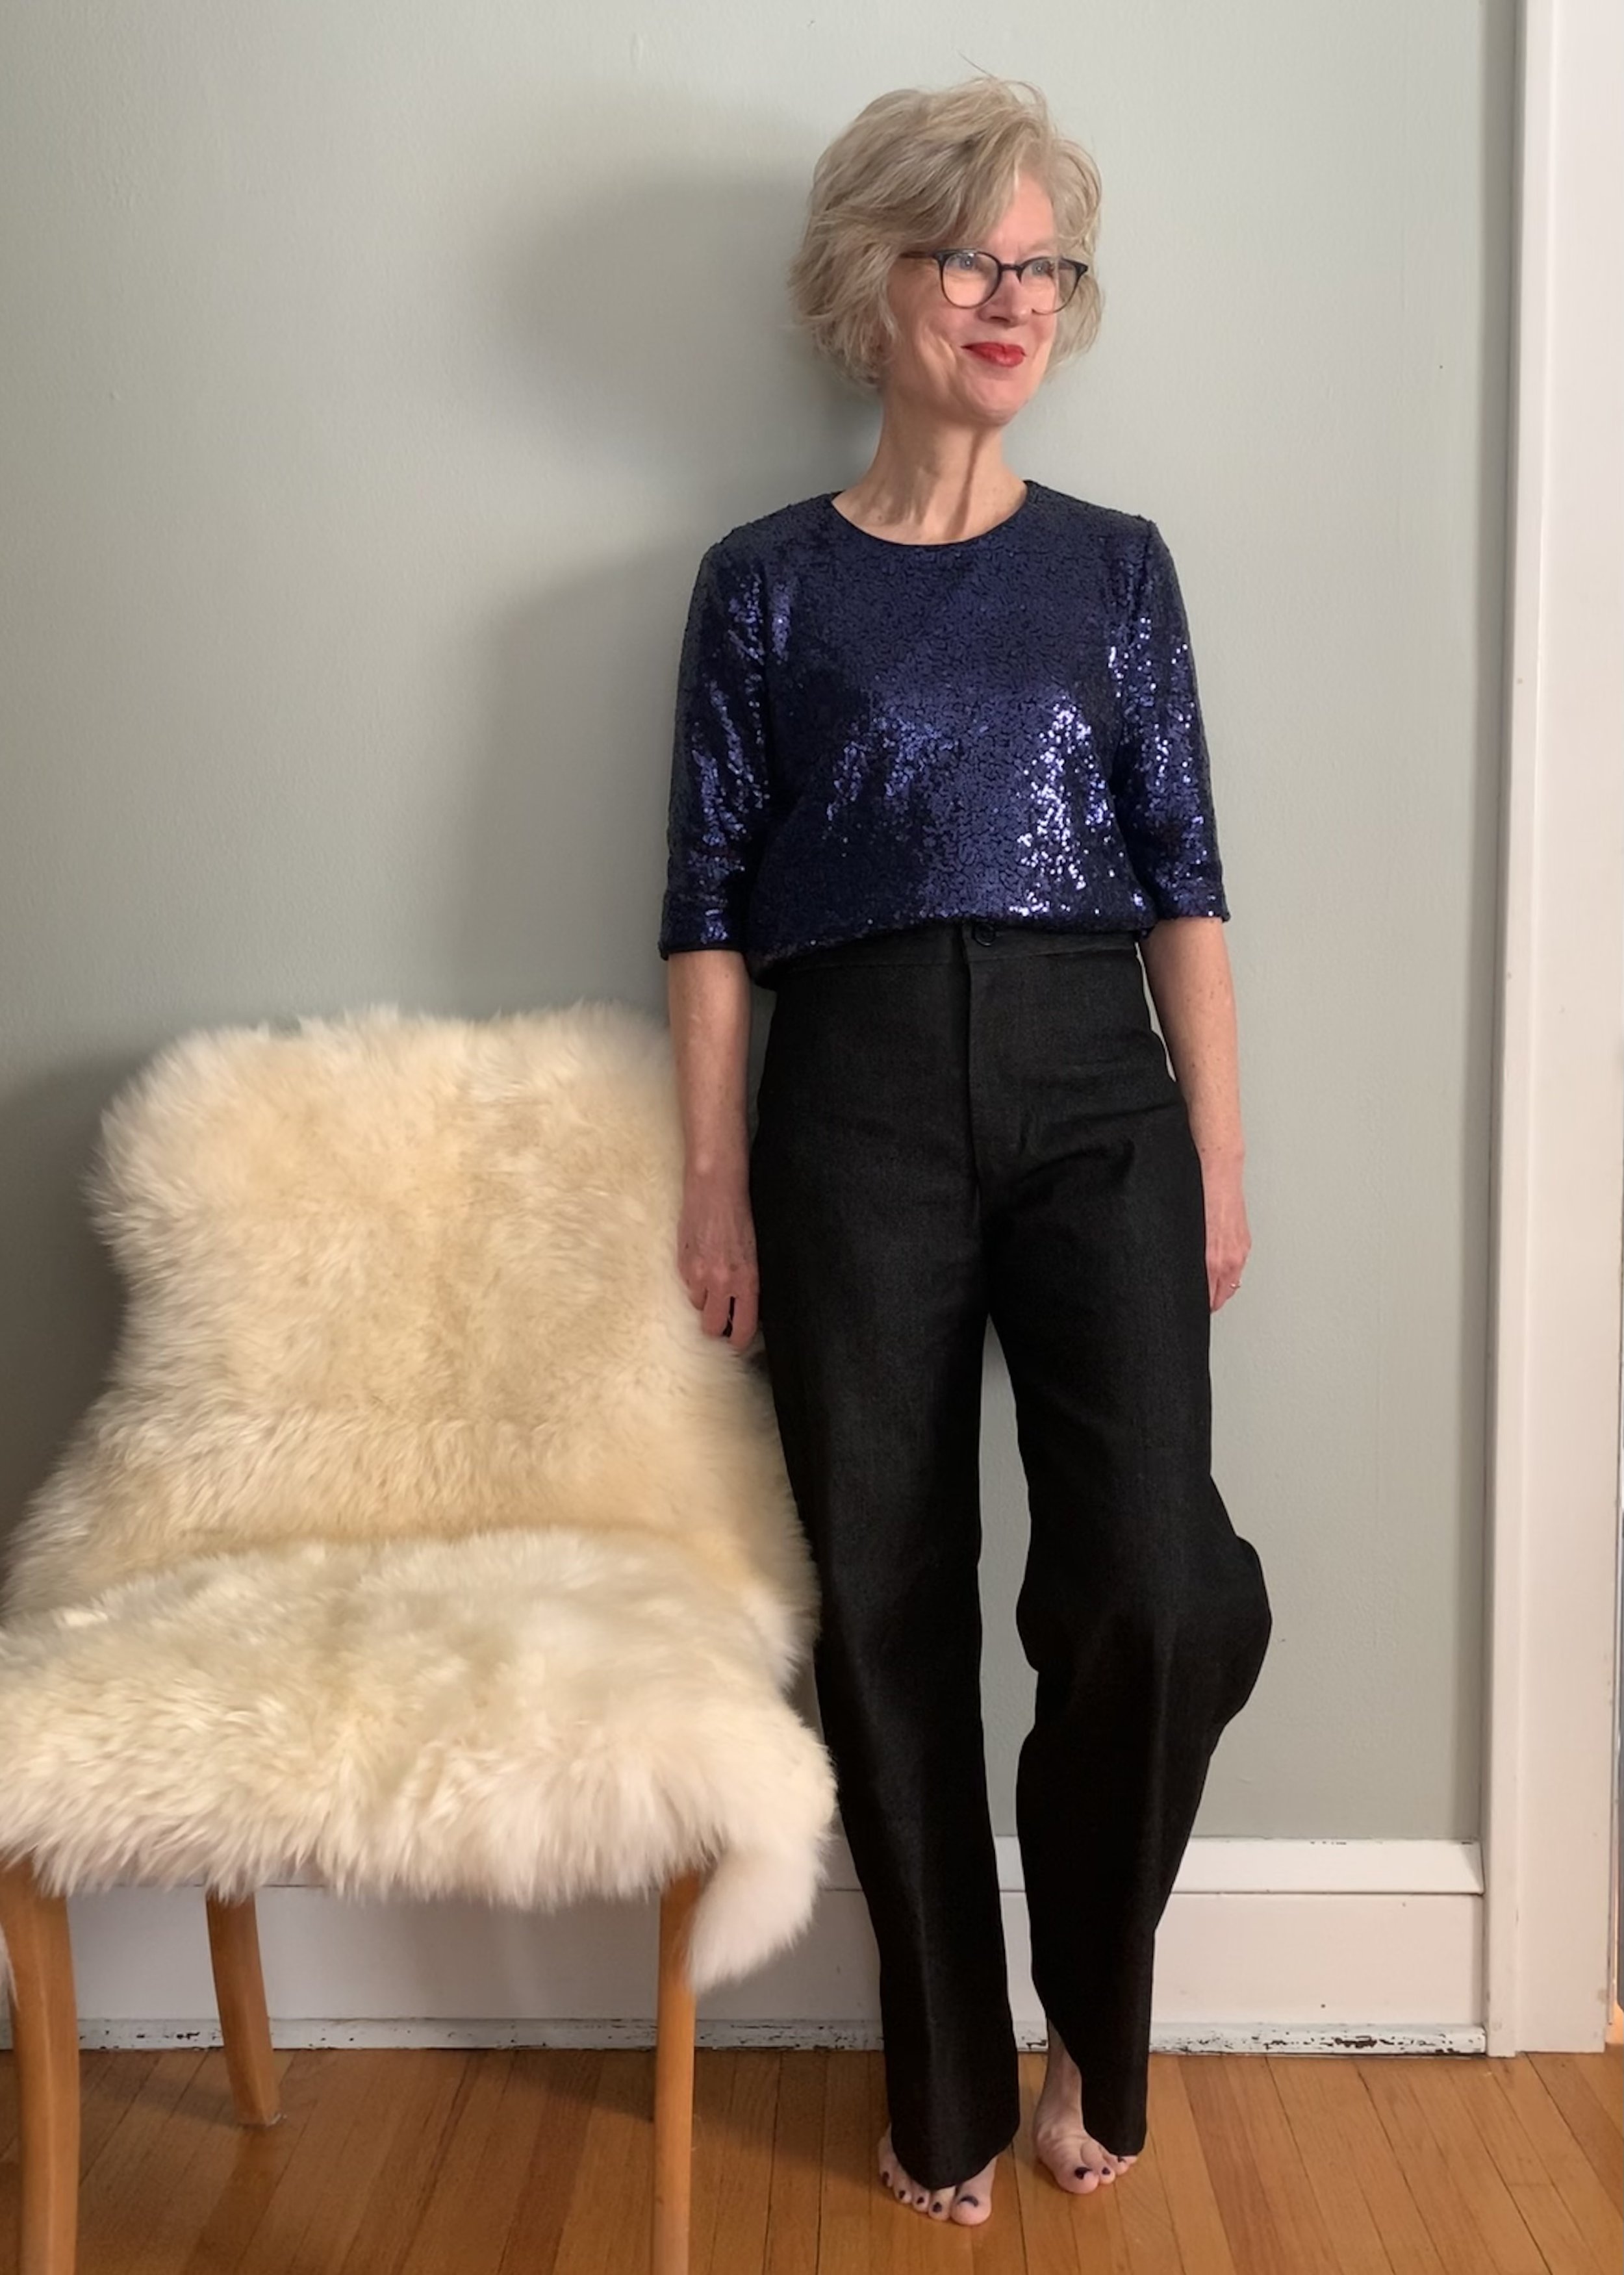
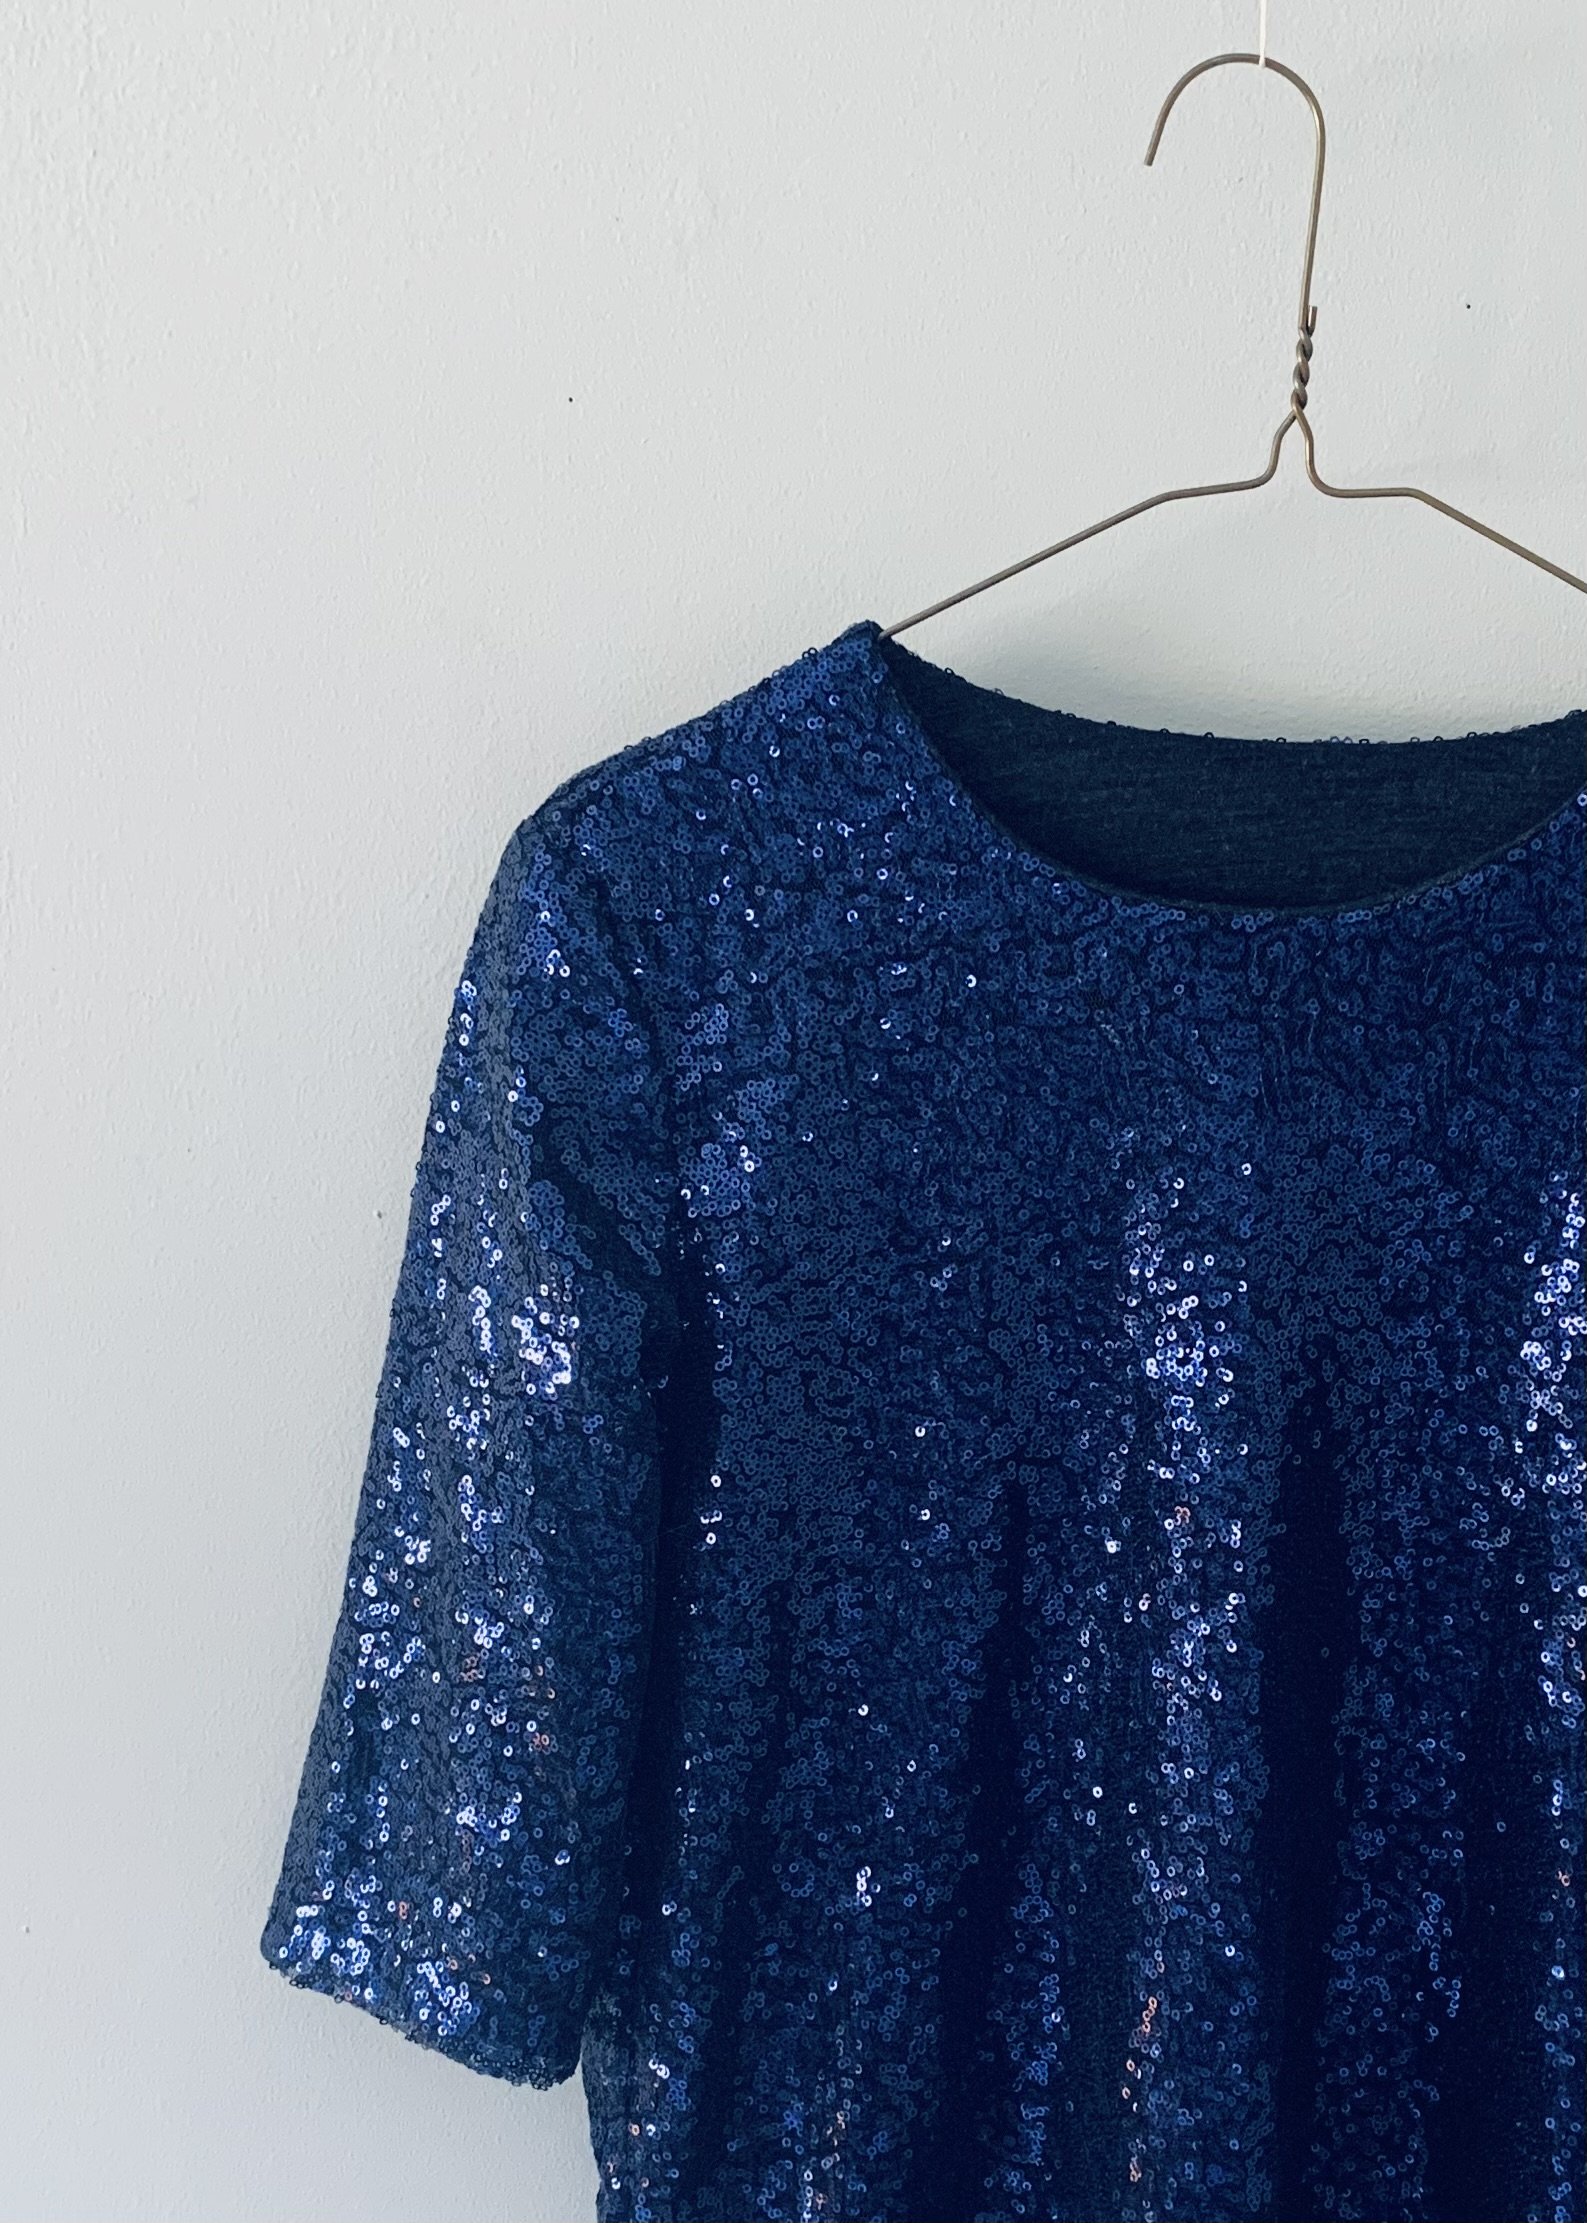
 Basically, I made the T-shirt according to instructions (except for the neckline): one t-shirt out of sequin fabric and one out of merino.  Then, I simply attached the merino lining to the sequin top at the neckline which created a great finish.  An ingenious blend of cozy and twinkle!  I paired it with True Bias Lander pants in black denim for laid back glamour. This project was so quick and easy I had time to paint my toe nails- navy of course to match my new top.  I think it is a great stay at home glamour outfit.  It may be sparkly fire on the outside, but it is soft, cozy on the inside.  

Refashioned Linen Shirtdress

Here’s a story about a remake times two.  I have a navy linen shirtdress that I made for myself several years ago that proved to be an amazing wardrobe work horse.  It was appropriate for practically every occasion: work, travel and play -dressy or casual.  But- years later- it is now too faded and too small/short? to keep performing it’s all star role in my closet.  I wear it around the house, but that’s about it- so I set about making a replacement.

IMG_3308.jpg

I started this replacement shirt dress saga by making a kind of mashed up and hacked version of Grainline Studios’ Archer and Adler patterns. I have made several Archer shirts (blogged about here) and often use it as a base for other tops and dresses. For some reason, I was feeling extra and I added a waistline and a very big gathered skirt.  This particular linen- purchased from Stone Mountain and Daughter Fabric -is a little bit opaque, so I thought a full skirt would eliminate the need for a lining- and maybe I was having a ball gown moment.

IMG_3572.jpg

If we are talking about versatility- I think navy is a champion color and I have quite a bit of it in my wardrobe. Linen is also definitely an all-around versatile fabric.  This particular light weight linen has dual magical properties: it is both crisp- see that collar- and it drapes.

IMG_3890.jpg

I had fun twirling around in the dress for pictures and I liked it styled with different belts and shoes for different feels- but after the picture-taking session, the dress hung unworn in the closet – and lingered unworn, and almost disappeared.  What the heck?  I made this expressly because my other navy dress was so wearable.

 So I decided the dress needed a significant overhaul- or refashion -to make it more wearable.  I made a few key changes to the skirt and sleeves to give this dress a more easy going, laid back and much less structured feel. 

IMG_6324.jpg

Let the unpicking begin! First, I completely took off the skirt and reduced the fullness, which made a big difference in the feel of this dress. I added a full button closure down the entire length of the skirt, and I also attached a casing and made a drawstring waistline for comfort and super easy style.  Last, I shortened the sleeves to relaxed elbow length.  Now it’s a great one and done every day kind of dress.

IMG_6805.jpg

It feels more versatile and I can still change it up a bit with belts, shoes and other accessories.

IMG_6635.jpg

I love how linen is a season spanning fabric.  This navy linen is suitable when the weather is cool, and we all know linen is the perfect fabric in a heat wave- and (surprisingly) it actually gets very hot and humid here in Minnesota in the summer. I wore the dress to brunch on the patio this weekend in extreme heat and it was perfect. This navy shirt dress- third edition- is a winner.

IMG_6267.jpg

An Interior Roman Holiday in Closet Core Cielo

Italy is increasingly haunting my dreams.  My longstanding love affair with this country began when I was a student in Rome in the 1980’s.  Because European travel is still on hold, I decided to pacify my Italian craving by creating my own interior Roman Holiday with the Closet Core Cielo dress- this dress, hanging out at the Romanesque styled Lady of Victory Chapel nearby and consuming plenty of pasta seems to be the best way to satisfy my appetite for all things Italian.

Pre-pandemic, I picked up this fabulous Ruby Star yarn dyed warp and weft heirloom fabric from Lakes Makerie.  It is whisper soft and extremely lightweight- yet not transparent- which makes it a perfect choice for an easy breezy summer dress.  During the recent heat wave, it was especially pleasing to work with and perfectly cool and comfortable to wear.

I purchased the Cielo dress pattern not long after it debuted as part of the Rome capsule wardrobe collection by Closet Core patterns.  I also purchased and made the Pietra pants which were part of this collection –and blogged about here.   I love my Pietra pants and have made a couple pair, but I never got around to making the Cielo- I seemed to be endlessly waffling over fabric choices.  Check out other makes and you will see that the Cielo pattern can work with pretty much any fabric and will give a different look depending on the substrate used.  I liked so many of the variations.  With such a wide open playing field I was paralyzed from making a decision.

When I finally landed on the Ruby Star fabric, I quickly got down to business.  First, I was a little concerned about scale.  I studied other Cielo makes and discovered several sewists sized down.  When I consulted the finished garment measurements, I decided to size down to a 0- a very bold move.  My regular size for Closet Core pattern would be a 4 to 6 in the bust.  I cut a size 0 from the top neckline to the bust line and then graded out to a size 8 at the hips- close to my measured size.  I also lengthened the dress.

FullSizeRender (1).jpg

This is a super quick sew with no zips or snaps.  Love that- making this dress was like a vacation.  I chose to finish the neckline with facings instead of bias binding because I am a big fan of a faced neckline.  I like the look and feel you get from a faced and interfaced neckline- the facings provide a bit of structure that the garment can hang from.  This fabric is particularly soft so the facings help provide shape. After easily putting the dress together, I tried it on and I felt a bit too angel wings in the shoulders and sleeves.  So I unpicked the sides and scaled down the armscye a bit by using a pullover woven tee pattern to help with the drafting.   And then I put the dress back together.

IMG_3645.jpg

I think the Ruby Star warp and weft earthy umber color has an Etruscan vibe and certainly helps achieve my interior Italian frame of mind.  I look forward to wearing this in Italy- when foreign travel is an option again.

IMG_4356.jpg

Ahoy! Romero trousers and sewing friends

Ahoy!  Several weeks ago, Instagram friends from across the globe- @suestoney @sewing_in_spain  - asked me to co-host the “Make a Garment a Month” (MAGAM) sewing challenge on Instagram in April.  No need to ask twice- it’s been a long and socially isolating winter, and I was more than ready for some sewing camaraderie.   And even though I’m more than used to conducting business and socializing online this year- it was a real thrill to have a Zoom meeting with Suzy and Sue over three continents: Europe, Australia and North America.  The guest host gets to pick the prompt for the monthly sewing challenge, and since my sewing daydreams were most recently filled with nautical style, I pitched April Ahoy as a theme.

I have a longstanding crush on nautical style.  Maybe it was all those J. Crew mail order catalogs I used to get in the 1980’s where everyone looked so healthy, fresh and happy. Nautical looks are timeless and suit everyone- they are gender and age neutral.  I love, love, love striped tops (and striped dresses), boat neck styles, pea coats, brass buttons- anything in the color navy! When I was in high school, I actually owned a full on navy sailor dress complete with a white sailor style collar and red neck tie. My long-time maritime romance is puzzling – as I am a lifelong resident of Minnesota- smack dab in the middle of the continent.

IMG_1771.jpg

For my nautical project I made the Pauline and Alice Romero sailor style trousers which I’ve made before - and I blogged about here. I always felt they were a little snug and I wanted to give the pattern another try to get a better fit.

FullSizeRender (3).jpg

There’s more than a few theories out there about the evolution of the wide legged sailor pant.  Some say the wide leg could be easily rolled up so feet and ankles were free from getting tangled while working on the rigging of sailing ships. Another theory is that rolling the pant prevents it from getting wet when swabbing the deck. One actual, practical use of the pants is as a life saving device.  If you have to abandon ship or fall overboard, you can easily remove the wide leg trouser, tie the legs in a knot and inflate the trousers with air.  Making pants into a flotation device is something I actually practiced in a water safety class when I was young.

FullSizeRender (2).jpg

Back to my pants project.  I used a twill fabric which had some stretch that I purchased a while back from the Fabric Store.  I cut a straight size 40.  Then, I carefully followed the excellent instructions for adjusting for a full backside provided by Colette- here

IMG_0067.jpg

Armed with colored pencils and a ruler- it was pretty straightforward to add some leeway to portside!

IMG_0068.jpg

And I achieved a ship shape fit after the adjustments!

FullSizeRender (1).jpg

To finish, I scoured my button collection and came up with almost enough brass buttons for the pants- there is one orphan button- still nautical though.

FullSizeRender (4).jpg

I am super pleased with my trousers- but the best aspect of this project by far- was the fraternizing fun- especially all of the nautical puns -shared with co-captains Suzy and Sue.

Cendre top- improving sustainability and international relations

I had great intentions to improve my sustainability efforts by making a zero waste pattern for quite some time- yet I never seemed to quite get around to it until inspiration came from across the border- Canada!.    .

An Instagram challenge suggested completing a sewing project with a friend, so I reached out to Hélène- @hportemanteau -who hails from Canada. I follow charming Hélène on Instagram and we have exchanged messages. Also, I admit I am a bit of a Canada fan girl- Banff, the genuinely friendly people,  Joni Mitchell, maple syrup, etc. I contacted Hélène and proposed improving the Minnesota-Montreal or US- Canada alliance with a joint February sewing project. Hélène agreed and brilliantly suggested we both make a zero waste project. Superb!

Zero waste patterns are patterns that produce a garment with little or no scraps.  A zero waste pattern typically has pattern pieces that fit together perfectly so virtually no fabric is wasted when cutting.

Hélène had already done a bit of zero waste pattern research and purchased a few zero waste patterns by Liz Haywood. For the February challenge, we both decided to make the Cendre top for maximum wearing potential and because it had several design variations - although in the end, we both chose the simple bateau neckline.

FullSizeRender.jpg

The Cendre pattern is more similar to a recipe than a traditional sewing pattern.  There are no pattern pieces to trace or tape- which can be a relief but also unsettling. You get drawn diagrams and measuring instructions.  I had that old adage measure twice, cut once in the back of my head.  In fact, I measured probably twenty times.  I was a bit nervous without the typical pattern piece security.  The pattern fits together like a puzzle and the leftover bits of fabric are used for embellishments, such as a belt or frills for this top. Although, I didn’t end up making any of those.

For my Cendre, I chose a piece of silk from my stash originally purchased from the remnant bin at Treadle Yard Goods -another sustainability win.

To begin, this top is cut across the fabric, with the selvedges at the top and bottom-which took me a minute to get my head around. This also means that you need a perfectly straight cut edge on both ends of the fabric. A tall order! Here is where I thank the fabric fairies, because I was able to tear the silk fabric which is not only super easy and eliminates measuring another ten times ten times- it also guarantees a perfectly straight edge.

IMG_7365.jpg

Look at the start of a lovely tear! I snipped through the selvedge and tore the fabric for an easy peasy absolutely straight edge. Then, I lined up the two pieces selvedge to selvedge for cutting as instructed.  Liz’s instructions and measuring guidelines are very clear. The actual pieces generally require drawing straight lines which is a snap with a straight edge.  For the one curve cut under the arm, I used my rotary cutter to trace a nice arc.

IMG_7368.jpg

The top was easy to put together once I puzzled out the pattern cutting. I made one slight modification- the instructions suggest using bias tape to finish the neck edge, but you need quite a bit of fabric to cut a self bias- and I was dealing with zero waste here.  The pattern suggests purchased bias tape but that wouldn’t be compatible with this silk.  So I created slim neck facings from the scraps.  I added a very light interfacing to the neckline facings- using interfacing scraps of course to stay on theme. I attached the facings and under-stitched them in place. I actually love a nice faced neckline.

FullSizeRender (1).jpg

For a zero waste pattern, this top packs plenty of style- especially the pretty (always flattering) boat neck and the sleeves.  I love how this looks in this swishy silk.

FullSizeRender (2).jpg

And as an appropriate finale to round out this little Canadian friendship project, my planned mini winter holiday just happened to take place in Grand Marais in Northern Minnesota.  While hiking in Grand Portage state park, only an icy river separated me from Canada! You can see Canada right behind me- Bonjour Hélène! Someday the borders will open again and we can meet in real life.

FullSizeRender (3).jpg